
A User’s Manual for Anxious Cats:
There’s a window of time between 2 and 14 weeks of age when kittens develop most of their opinions about the world. One of the questions their little brains work to figure out is, “Are humans safe or dangerous?” Kittens born outdoors learn vigilance and distrust as a matter of survival. If humans don’t intervene to convince them otherwise, those kittens will grow into feral adults, skittish as a squirrel. But if a kitten is brought indoors when they’re say, 6 weeks old, and given food and warmth and treated kindly, they develop into your average house cat.
It can be helpful to think of a cat’s comfort level using a range on a spectrum. How do they react to unfamiliar situations? How do they feel about strangers? How likely are they to get upset at loud noises and how upset will they get?
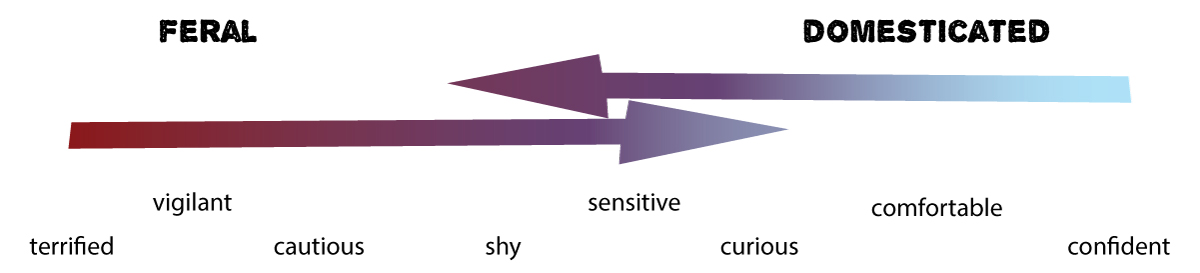
Kittens who were under-socialized -- who didn't have much or any positive interaction with humans before the age of 16 weeks -- can still be domesticated successfully, but they don’t relax into the indoor life as smoothly and may hold onto anxious tendencies into adulthood. That usually means they’re startled more easily, more intensely, by a wider variety of things. Their natural anxiety can make it harder for them to enjoy all the benefits of indoor life or to bond with their human caregivers. That doesn't make them a lost cause, but it does mean they'll have limits and that helping them develop confidence requires a solid understanding of cat psychology and a commitment to continuously reinforcing confident behaviors.
In addition to early socialization, genetics has a lot to do with where a cat will fall on the spectrum. Nature and nurture combine to create personality traits that become somewhat settled in the adult, but there's always room for adjustment. Just like people, cats continue to learn and grow throughout their lives.
How to integrate an anxious cat into your life:
Note: Confident cats can move through this process fairly quickly without needing to take baby steps. But anxious cats need more time to adjust and more reassurance along the way. Moving to a new phase of integration should push your cat slightly out of his comfort zone (that’s how progress is made), but not create panic. If your cat isn’t ready, move back to a previous step, regroup, and then continue forward with a less intense challenge.
The goal is to positively reinforce confidence: The mindset is never, “Bad job for being anxious!” Instead, always look for opportunities to say, “Good job for being slightly less anxious now than before.” The more anxious the cat, the more subtle the progress that should be rewarded (and celebrated). The fastest way to build a cat’s confidence is to notice and reward every time they show even the tiniest amount of curiosity, cooperation, or affection.
Rewards don’t always have to be food, but they do have to be something your cat genuinely likes (not just something you think your cat’s supposed to like). Learn to read your cat and discover their likes and dislikes of food, toys, verbal praise, and physical affection.
Never scold or try to use punishments on an anxious cat! Their behavior reflects their need for safety, so anything negative coming from you will be read as threatening. Ignore undesirable behaviors when they happen and find ways to manage and prevent them from happening in the future. For example, if it's necessary to pick up your cat and he is swatting at you, stay calm! Use a towel or gloves to protect your hands from harm and finish whatever you need to do as quickly as possible.
Phase 1: Set things up so your anxious cat is easy to catch. For very anxious cats, it’s best to start them off in a cage. A multi-level cat cage works best, but any cage big enough to hold a small litter box, some kind of bed, and food and water bowls will work. If necessary, cover the cage with a blanket to provide extra security. If possible, have the cage in a quiet, cat-proofed space ready for phase 2.
Phase 2: Less anxious cats can skip the cage and immediately have a little more freedom. Keep them in a small bedroom or bathroom - somewhere quiet, where you can keep the litter box, water and food bowls, and a comfortable place to sleep. You can also offer toys and a small surface for scratching. For this phase, you’ll keep the door closed so your cat can’t go exploring the rest of your house. Limiting options is the key to teach confidence. Yes, let your cat hide but no, don't let them hide far from you in a place where it's difficult (or impossible) to get to them. Block access to any inconvenient hiding places (that includes under furniture or behind the toilet). Barriers don’t have to be fancy -- strategically placed cardboard and duct tape usually does the trick. Give your cat an alternative hiding spot (an upside-down cardboard box with an entry hole cut into it makes a nice cat cave).
Phase 3: Let your cat settle and get used to your schedule. If your cat is interested in treats and/or attention, give it to them. But if your cat is clearly trying to avoid you, give them their space for at least a day or two. Have set mealtimes (at least two or three times a day) with an appropriate amount of food so that there aren’t leftovers when it’s time for the next meal. Even cats who find humans terrifying can’t help but start to look forward to seeing the person who feeds them when they’re hungry. If possible, stay in the room until the cat has started eating. You may need to start with the food close to the cat and you far away, waiting quietly, for a while.
Phase 4: Get your anxious cat used to your touch. If your cat is ready to jump on your lap, you won’t need to worry about most of these milestones, but if your cat is very anxious, you’ll need to apply positive reinforcement techniques.
The basics of positive reinforcement: https://www.hshv.org/training-cats-with-positive-reinforcement/
Clicker training techniques (optional, but fun): https://www.clickertraining.com/cat-training
When you’re starting out, training sessions should be short and frequent. A few minutes every day is better than an hour once a week. Always end on a positive note if you can. Go at your cat’s pace. An extremely nervous cat may need a month of daily feeding before they’re willing to sniff you. A shy cat may only need a day before they’re purring in your arms.
Put cat food (wet is best) on your fingers and offer them for sniffing, palm up, through cage bars. One milestone is if they’re willing to sniff. Another is when they lick up the food. The next is when they come sniffing at your fingers even without food on them.
The single finger chin scratch. After your cat sniffs your offered fingers, use your index finger to touch their cheek/chin area. If the cat leans in, reward them with a nice chin scratching. If not, don’t try to force it. First you have to prove to them that your touch isn’t scary. Then you can prove to them that it’s enjoyable.
For cats uncomfortable with hands, overhand petting is much scarier than underhand petting, so don’t come at them with your hand over their head, palm down, before they’re ready. Start petting sessions palm up and slowly start to get permission to touch other parts of their body. If they are flinching or tense, slow down.
When your cat seems comfortable enough being touched, you can start working on picking them up. For very anxious cats, the first step might be putting your hands in position and then letting go after a few seconds without actually lifting them. For those kinds of cats, always do this training somewhere the cat can’t run away from you. You want to avoid situations where you might have to chase the cat around to catch him. Be careful you’re not making the cat feel cornered. Remember, you’re asking your cat to be calm, cooperative, and curious in the face of something a little bit challenging, so reward him when he displays those qualities.
When you do actually lift the cat into the air, be prepared for their reaction. If you push too hard and they panic, you’ll lose progress if they manage to escape. Their takeaway will be: “I’m alive because I managed to get away!” But if you can hold them until they stop squirming and then put them down, you’ve taught them that arguing is ineffective and being calm is the way to get you to release them. Putting a hand on the scruff of their neck can help keep some cats calm, but will make other cats more likely to panic. If your cat shows aggressive tendencies, you’re going way too fast! You may want to incorporate protective gear (like towels or bite safety gloves) into your training sessions so your cat can get used to those things, but always aim to go slow enough that your cat doesn’t feel the need to try to bite you.
When you can pick up your cat and hold him, gradually increase the time you spend holding him and the amount of noise and busy-ness surrounding you.
Phase 5: Give your cat more freedom. If your cat wants to hide when you put their food down, they’re definitely not ready for whole-house access. But even if you can’t pick them up yet, if they get excited at mealtimes and immediately rush toward you for food, they’re ready to start this step. Start by leaving the door to their room open for short periods of time. Supervise them closely as they begin to explore. Try not to give them too many options too quickly. If they get startled while out-and-about, you want them to run straight back to their room. Let them out for short, frequent outings until they seem more relaxed than wary. When you’re sure they know how to get back to home base (where their food, water, and litter box is), you can give them longer, less-supervised time out of their room. Continue taking small steps until your cat is comfortable roaming the house, interacting with other pets you might have, and getting on with the business of normal, everyday life.
Strategies for integrating new pets with existing pets: https://www.humanesociety.org/resources/introducing-pets
Going forward:
After your cat is integrated into your home, you may want to relocate the litter box. Do it gradually by adding a second litter box in the new location and then taking away the first box when you’re sure your cat is using the second one. Keep in mind it’s always better to have too many litter boxes around than too few. And it matters where you put them. Pick a location that won’t turn the cat off.
Moving feeding and watering locations is generally as simple as showing the cat where you’re moving the bowls to. If you want to move them to a room your cat is less than comfortable in, you may have to move in stages. There are rooms an anxious cat may never want to go in or may only go when the house is quiet. Starting to feed your cat in a busier, noisier (ie. scarier) part of the house can be a good way to further develop their confidence, but be mindful that you’re not pushing so hard they’re getting dehydrated or not finishing meals. Remember that each new step should take the cat a little bit out of their comfort zone, not a lot!
When you’ve got the gist of how positive reinforcement works, you can work on all kinds of behaviors with your cat. Think of your final goal, break it down into small steps, and take the cat through each step slowly, with lots of rewards along the way. If you’re running into roadblocks, resources are an internet search away, ranging from free articles you can read to build knowledge and animal behaviorists you can hire to work with you and your cat individually.
Just a few examples of useful behaviors to work on with your cat:
Going into a pet carrier on command
Cooperating with nail trimming (important!)
Allowing physical examination (the kinds of stuff that happens at the vet’s office)
Coming when called
Interacting with strangers
Desensitization to loud noises
Everyday life and other challenges:
Big changes can be especially difficult for anxious cats, so give them more attention during major upheavals, like moving to a new place, having construction done on your home, or adding a new (animal or human) family member. But even when nothing really dramatic is happening, cats in the middle of the anxiety spectrum can start backsliding into more fearful behavior as relative minor disruptions add up over time.
General tips to block anxiety and promote confidence:
Prevent access to any dark dark hidey-holes where it’s difficult (or impossible) to get a cat out of (ie. spaces under cabinets, underneath heavy beds, miscellaneous crawlspaces). If an anxious cat gets stuck somewhere, they may not may not call for help. And even if they’re able to get back out, they may stay in there for long enough to worry you. The search, the discovery, and all the fuss that goes with trying to figure out how to get the cat out will all be extremely stressful for an anxious cat and best avoided in the first place. Similarly, it’s helpful to be aware of closets and pantries, basement and attic access, etc. Don’t leave doors open where an anxious cat might sneak in and get shut in a few minutes later.
Because cats with feral tendencies don’t completely trust the roof over their heads, they feel more relaxed when they have quick access to predator-proof locations. That means small, dark spaces where they can’t be seen or high perches where nothing can sneak up on them. To provide this sense of safety, you can buy little tents or cubbies specifically designed for cats, install cat shelves on your walls, or invest in a tall cat tree. Ideally, you want at least one such refuge in any room of the house your anxious cat might visit throughout the day. You have endless style, size, and price options, from designer modular cat playgrounds to leftover cardboard boxes.
It’s helpful to set up no-harassment zones, especially if you have dogs or small children in your household. A gate on a bedroom doorway can give an anxious cat a place to go to wind down and relax when they get overwhelmed. Make sure the kids know that when the cat is in his winding-down spot, they’re not allowed to bother him in any way.
To reduce the risk of medical and behavioral issues, ensure water and litter boxes are easily accessible at all times. Provide multiple options if possible. Preferably, they should be in a low-traffic area your cat actively enjoys visiting, like the feeding area and/or winding-down area, but at minimum, avoid making your anxious cat feel like they have to run a gauntlet to get a drink or empty their bladder. Use whatever style of litter and litter boxes and water bowls or fountains your cat prefers. For example, automatic robot litter boxes are nifty, but too scary for most anxious cats. Think like your cat!
Don’t get too far off-schedule. Routines make it easy to monitor your anxious cat’s health, eating habits, and location. Even if something scary happens -- like house guests in the afternoon -- a schedule means you can still expect to see your anxious cat at dinner time. If you need to catch your cat for occasional adventures (like nail trims or going into a carrier for a vet visit), feeding times can be a great time to do that without a lot of fuss. If your cat loves toys or being brushed, scheduled playtime or grooming time are great ways to stabilize your cat’s daily experience as well. And keep an eye out for your cat’s attempts to get more attention. For example, extremely anxious cats can seem anti-social until you realize they’re sleeping in their owner’s bed every night. That’s an easy time to begin a ritual of petting with a cat who might otherwise never consent to be touched. Even the most anxious of cats can enjoy human contact, they just need to be approached in the right way, at the right time.
Anticipate problems and make adjustments. For example, if your cat panics when strangers come over, set your cat up in a quiet, private room before your party guests arrive. If your cat gets so freaked out when you run the vacuum cleaner that he’ll hide for hours afterwards, don’t run the vacuum cleaner 30 minutes before dinner time. Don’t slather your hands with hand sanitizer and then immediately try to pet the cat. Do some refresher training with your cat starting a week before his scheduled vet visit so he’s easy to get in his carrier and less likely to panic during his exam. You get the idea!
Once a behavior is established, you don’t need to practice it constantly, but everyone will needs refreshers at some point. If your cat has lost progress, go back to the basics -- train in short sessions, with low challenge and high reward.
Be prepared for setbacks and frustrations. If your cat develops a behavioral issue you can’t figure out, always rule out a medical issue first. Make sure your challenges are not too challenging and your rewards are rewarding enough. Positive reinforcement is extremely effective at changing mindset and, therefore, behavior, but cats with extreme issues will have more limits. The more you learn about behavioral psychology, the better equipped you’ll be to make desired changes, but that doesn’t mean you have to learn everything at once or all on your own. Ask for help when you need it. Remember that just because something doesn’t go the way you expected it to, doesn’t mean it was a mistake or a waste of time. It’s all a learning experience.
Never take your cat’s anxiety personally. Try to empathize: If you were afraid of heights and someone handed you a kitten at the top of a ferris wheel, you’re not going to enjoy holding that kitten the same way you would if you were on the ground. It doesn’t mean you don’t like kittens! For an anxious cat, lots of things feel like they’re happening at the top of a ferris wheel. It doesn’t mean they don’t enjoy things; it just means they’re distracted by their anxiety.
It’s important to celebrate small victories. Some cats will never not flinch when you reach out to them, but it makes the sound of their purring that much sweeter.
How to speak cat:
Reading cat body language:
https://www.tuftandpaw.com/blogs/cat-guides/the-definitive-guide-to-cat-behavior-and-body-language
Calming signals are behaviors animals use to calm themselves and others. If you see your cat perform a calming signal, reward them! It means your anxious cat is actively trying to self-soothe and/or reduce the tension in the room. You can perform calming signals yourself as a way to communicate relaxation to your cat. Exaggerate movements slightly for best effect.
Yawning (they’re contagious for evolutionary reasons)
Slow blinking (open and close your eyes very slowly)
Breathe deeply (slow your heart rate down)
Think of how you look/smell/sound to your cat and make yourself as non-threatening as possible. For example:
Squat or sit to make yourself smaller (and/or invite the cat to jump up to eye level)
Remove bulky, flowy, or reflective clothing (ie. coats, hats, beards, wigs, sunglasses, heavy boots)
Wash off strong/unfamiliar smells (hand sanitizer, gasoline, the neighbor’s dog)
Pitch your voice higher and speak softly (aim for “angelic mom” energy)
Avoid sudden and/or sweeping movements (anything that looks like you’re trying to “get them”)
Avoid direct prolonged eye contact (or any eye contact with very anxious cats)
Have another cat “vouch” for you (letting an anxious cat see you interact with a confident cat can help reassure the anxious cat that you’re not a threat)
Calm yourself (your mental state affects your cat, so project peace, not anxiety)
Advanced training plan:
Look at your cat’s behaviors on a spectrum and work on them one at a time.
Think about the following: Where is your cat now? Where do you want them to get to? What are the small steps that can get them there?
Enjoys being held
Tolerates being held for long periods
Tolerates being held for short periods
Freezes while being held
Fights while being held
Actively avoids any chance of being picked up
Demands attention from strangers
Indifferent to strangers
Hides when strangers arrive but will come out to investigate them after some time has passed
Hides when strangers arrive but come out soon after they’ve left
Hides when strangers arrive and continues hiding for hours after they’ve left
Indifferent to the vacuum cleaner
Momentarily alarmed but then indifferent
Finds higher ground while vacuum is running
Hides out of sight/in another room while vacuum is running but comes out shortly after it’s off
Hides for long periods of time even after vacuum is turned off
Advanced reading: https://anticruelty.org/pet-library/desensitization-and-counterconditioning-fear-cats
[written by Vania Velotta, multi-decade animal rescuer, feral cat mom, and professional pet groomer]


